TRY THIS! Paper Airplane

TRY THIS!

Design and construct a model airplane using simple materialsthat can travel at least 15 feet in large room or hallway where there is no noticeable draft or air current.

What You'll Need

  • Paper (of any kind)
  • Tape
  • Scissors
  • Tape measure
  • Objects to mark start and finish lines

Check the bottom of the page for supplies and materials you might need along with some links to design ideas.

BE SAFE!

Always check with a parent or guardian before you start a project and make sure it is okay to use materials you find around the house.

Paper airplane

Taking Flight

Whether you’re a world traveler who’s flown on dozens of planes or whether you’ve only seen them in photos, you likely recognize some features of airplane design.

Airplane parts and function

Here are some helpful terms to know about things that fly:

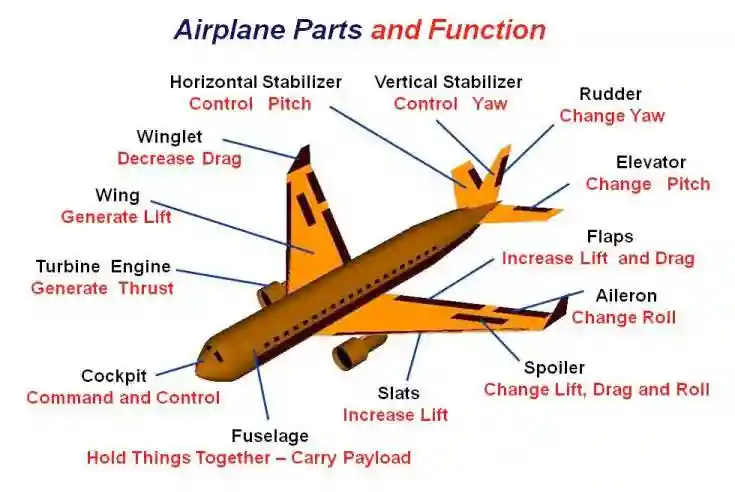
Lift is the force that pushes the airplane up.  It is created by the air moving around the plane. The shape of the wings helps create lift and is very important in plane design.

Weight is the force that pulls the airplane toward Earth. Commercial airplanes are built so that their weight is spread from front to back, helping to keep the plane balanced. Paper airplanes often concentrate weight in specific places in the design to help the plane maintain a flight path. 

Thrust is the force that moves the airplane forward. Commercial airplanes use engines to maintain thrust. Gliders and paper airplanes must rely mostly on an initual push or throw.

Drag is the force that slows down the airplane. Commercial airplanes are designed to let air pass around them with minimal drag. Some paper airplanes designs include features that increase drag slightly in order to create a more steady flight or to create a distinctive flight path.

Pitch is the angle of the the plane from the front to the back. If a plane is pitched forward, its front or nose is lower than its tail.

Roll is the angel of the plane from side to side. If a plane rolls left, then the the left side of the plane is lower than the right.

Yaw is used to descibe the horizontal motion of the plane from side to side. Imagine a plane flying straight away from you with its wings horizonal - its nose would appear in line with its tail.  If that plane were to yaw right, it would would appear be turning right (while the wings remained horizontal) - the nose would appear to be further right than the tail.

Note: changes in pitch, roll, and yaw often happen at the same time.  In fact, to achieve a smooth flight a pilot will adjust the controls for all three, to "bank to one side". This effectively uses the planes lift to turn.

When engineers are designing solutions, they often create a model to test their designs. With airplanes, it’s especially important to test models for things such as the shape of the wings and front of the plane (called the “nose cone”) before building a full-size version.

Making Paper Fly

Making paper airplanes follows the same process as designing planes that carry people and cargo across continents.  You start with researching what others have done and sketching out ideas.  Then you create different prototypes and test test them.  Different designs may work differently when made with different weights of paper.  For eample, a design that glides well when made of notebook paper, may crash quickly when made from construction paper. 

Here's the designer of the world record paper airplane talking about design and showing how to fold his record breaking design:


You can also check out this article about engineers from Boeing who broke the paper airplace world distance record in 2023.

Getting Started

Your challenge is to design a paper airplane that can travel at least 15 ft (then 20, 30, or even 50 ft) in a large room or hallway where there is no noticeable draft or air current.

  1. Design and construct your model airplane.
  2. On one end of a large indoor space, where there is no noticeable air current, mark a straight line using tape or string. This will be your starting line for launching your plane.
  3. From the starting line, use measuring tape to measure a straight line that’s at least 15 ft. If possible, extend your measuring tape to 20, 30, even 50 ft or more to increase the challenge (the world record paper airplane flew 226 ft – though not in a straight line). Mark the challenge goal distance with a line marked with a weighted ruler, meter stick, or a strip of painters or masking tape. You may want a friend or parent to help you with this step so that one person holds the end of the measuring tape at the starting line and the other extends the tape.
  4. Step up to the starting line and give your plane a throw! You can take up 3 steps prior to releasing your plane, but no part of your body may cross the starting line.
  5. It will help to have a second or third person help you spot where the plane lands and make measurements. If your tape measure is short, you can measure a straight line from the spot where it landed to the nearest goal line.

Did your plane travel at least 15 ft? If so, see if that plane or a new design can travel 20 ft, 30 ft, or 50 ft. If the distance your plane traveled is less than 15 ft, try modifying your design or creating a new model.

Try this next!

If you enjoyed this activity – take it a step further with more design challenges!

  1. Using the same materials, can you design and construct a plane that is optimized for speed as well as distance? You’ll need a stopwatch for this activity (Pro tip: cell phones have a stop watch in their “clock” apps) How many seconds does it take for your plane to travel at least 15 ft?
  2. Rather than speed, try optimizing for time in the air. Can you build a plane that will “float” for longer than 15 seconds? How about 20 seconds?
  3. Design a transport plane. Can you create a plane that will carry the weight of a pencil? How can you maximize the amount of time the pencil stays in the air?
  4. What if you could use other lightweight materials (such as foam board or aluminum foil) to construct your plane? How might you decide the best material for distance? For speed? For time in the air? For transporting a pencil?
  5. Once you are confident in your airplane making skills, consider designing a helicopter instead. Can you design helicopter blades out of paper that will carry the weight of a pencil?

Supplies and materials

The goal of this activity is to get creative and practice engineering design! If you don’t have the exact materials on hand – check around to see if there are other materials that you can use instead.

Paper Rolls

Here are some different kinds of paper to consider:

  • construction paper
  • notebook paper
  • printer/copy paper
  • wrapping paper
  • watercolor paper
  • newspaper
  • old road maps
  • pages from a magazine
  • pages from an old phone book
  • cardstock
  • empty cereal or pizza boxes

Creating clean, sharp folds is important to implementing your paper plane design. It may help to use a ruler or other straight edge to mark edges to make sure that your folds are even. A folding tool is helpful when working with thicker paper, but you can also use wooden spoon.


Photo credits:
Paper airplane image by Alexander Lesnitsky on Pixabay
Airplane parts & function diagram courtesy of NASA
Paper rolls image by norriuke on FreeImages

Try Again!

Check out other EngineerGirl design challenges!